
高效的iPhone X适配技术方案(UGUI和NGUI)
- 作者:admin
- /
- 时间:2018年06月12日
- /
- 浏览:13682 次
- /
- 分类:厚积薄发
本文作者旨在通过改锚点的方式,分别实现在NGUI和UGUI上的iPhone X适配技术方案,并结合自身项目经验,阐述了主要的实现细节,希望能对广大游戏开发团队有借鉴意义。
适配来源: 按照苹果官方人机界面指南 :
https://developer.apple.com/ios/human-interface-guidelines/overview/iphone-x/
在iPhone X 异形屏幕上,苹果提出了Safe Area安全区的概念,这个安全区域的意思是,UI在Safe Area能够保证显示不会被裁切掉。
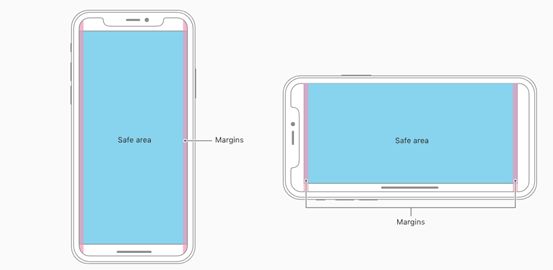
按照苹果的设计规范,要求我们把UI控件放在Safe Area内,而且不能留黑边。在Unity中就需要解决,怎么以更少的工作量把所有界面的控件停靠在Safe Area内,黑边的部分用场景或者背景图填充。
当我们横持iPhoneX的时候:
iPhone X整体像素为2436 x 1125像素;
整体SafeArea区域为2172 x 1062像素;
左右插槽(齐刘海和圆角,再加一个边距)各132像素;
底部边距(由于iPhoneX没有Home键,会有一个虚拟的主屏幕的指示条)主屏幕的指示条占用63像素高度,顶部没有边界是0像素。
一、技术方案
1.改相机ViewPort
直接把UI相机的视口改为Rect(132/2436, 0, 2172/2436, 1062/1125),然后把背景图设为另外一个相机。这样做的好处是,完全不用改原来的Layout。坏处是,多个UI的情况下,背景图和主UI之间的深度关系要重新设置。
2.缩放
把主UI的Scale设为0.9,背景图的Scale设为1.1,这样就能不留黑边。这个方法的好处是简单,坏处是会引起一些Tween已及Active/InActive切换之间的问题。
3.改锚点
分2种情况,NGUI和UGUI都有点不同。正好我都有2个项目的完整适配经验,所以才写了这个分享。
二、实现细节
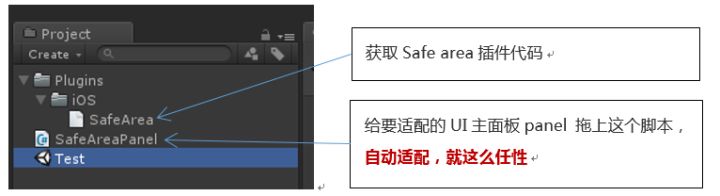
首先我们拿到iPhone X 安全区域,Unity得开发插件OC代码来获取。SafeArea.mm拷贝到项目的Plugins/iOS目录中。
//获取iPhoneX safeArea
//Jeff 2017-12-1
//文件名 SafeArea.mm
#include <CoreGraphics/CoreGraphics.h>
#include "UnityAppController.h"
#include "UI/UnityView.h"

CGRect CustomComputeSafeArea(UIView* view)
{
    CGSize screenSize = view.bounds.size;
    CGRect screenRect = CGRectMake(0, 0, screenSize.width, screenSize.height);

    UIEdgeInsets insets = UIEdgeInsetsMake(0, 0, 0, 0);
    if ([view respondsToSelector: @selector(safeAreaInsets)])
        insets = [view safeAreaInsets];

    screenRect.origin.x += insets.left;
    screenRect.size.width -= insets.left + insets.right;

    float scale = view.contentScaleFactor;
    screenRect.origin.x *= scale;
    screenRect.origin.y *= scale;
    screenRect.size.width *= scale;
    screenRect.size.height *= scale;
    return screenRect;
}

//外部调用接口
extern "C" void GetSafeArea(float* x, float* y, float* w, float* h)
{
    UIView* view = GetAppController().unityView;
    CGRect area = CustomComputeSafeArea(view);
    *x = area.origin.x;
    *y = area.origin.y;
    *w = area.size.width;
    *h = area.size.height;
}
设计通用的适配component,哪些面板要适配,就直接添加这个脚本:
using System.Collections;
using System.Collections.Generic;
using UnityEngine;


/// <summary>
/// 设计安全区域面板(适配iPhone X)
/// Jeff 2017-12-1
/// 文件名 SafeAreaPanel.cs
/// </summary>
public class SafeAreaPanel : MonoBehaviour
{

    private RectTransform target;

#if UNITY_EDITOR
    [SerializeField]
    private bool Simulate_X = false;
#endif


    void Awake()
    {
        target = GetComponent<RectTransform>();
        ApplySafeArea();
    }

    void ApplySafeArea()
    {
        var area = SafeAreaUtils.Get();

#if UNITY_EDITOR

        /*
        iPhone X 横持手机方向:
        iPhone X 分辨率
        2436 x 1125 px

        safe area
        2172 x 1062 px

        左右边距分别
        132px

        底边距 (有Home条)
        63px

        顶边距
        0px
        */

        float Xwidth = 2436f;
        float Xheight = 1125f;
        float Margin = 132f;
        float InsetsBottom = 63f;

        if ((Screen.width == (int)Xwidth && Screen.height == (int)Xheight)
        || (Screen.width == 812 && Screen.height == 375))
        {
            Simulate_X = true;
        }

        if (Simulate_X)
        {
            var insets = area.width * Margin / Xwidth;
            var positionOffset = new Vector2(insets, 0);
            var sizeOffset = new Vector2(insets * 2, 0);
            area.position = area.position + positionOffset;
            area.size = area.size - sizeOffset;
        }
#endif

        var anchorMin = area.position;
        var anchorMax = area.position + area.size;
        anchorMin.x /= Screen.width;
        anchorMin.y /= Screen.height;
        anchorMax.x /= Screen.width;
        anchorMax.y /= Screen.height;
        target.anchorMin = anchorMin;
        target.anchorMax = anchorMax;
    }
}
using System.Collections;
using System.Collections.Generic;
using System.Runtime.InteropServices;
using UnityEngine;

/// <summary>
/// iPhone X适配工具类
/// Jeff 2017-12-1
/// 文件名 SafeAreaUtils.cs
/// </summary>
public class SafeAreaUtils
{
#if UNITY_IOS
    [DllImport("__Internal")]
    private static extern void GetSafeArea(out float x, out float y, out float w, out float h);
#endif


    /// <summary>
    /// 获取iPhone X 等苹果未来的异性屏幕的安全区域Safe are
    /// </summary>
    /// <param name="showInsetsBottom"></param>
    /// <returns></returns>
    public static Rect Get()
    {
        float x, y, w, h;
#if UNITY_IOS && !UNITY_EDITOR
            GetSafeArea(out x, out y, out w, out h);
#else
        x = 0;
        y = 0;
        w = Screen.width;
        h = Screen.height;
#endif
        return new Rect(x, y, w, h);
    }
}
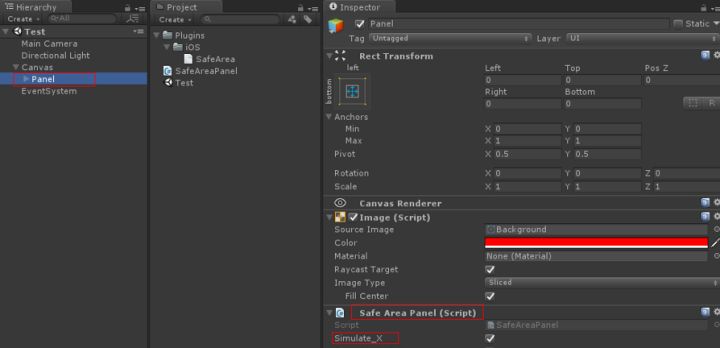
比如这样,给Panel加了Safe Area Panel这个组件,勾选Simulate_X模拟iPhone X运行。
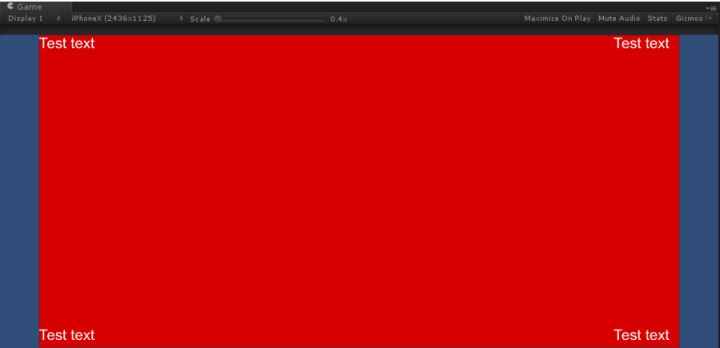
运行时图(红色区域是UI主面板正常是全屏的,这里根据Safe Area,自动适配后调整锚点展示的左右边距下边距,最底层蓝色区域是场景或者UI背景图区域)。
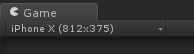
添加一个812x375就可以模拟iPhoneX的效果

如果是旧项目是使用NGUI来开发的,原理一样,也得用到以上Safa Area.mm来获取安全区域,不同处在于修改NGUI的源码,而NGUI版本有好多。不要忘记把SafeArea.mm拷贝到项目的Plugins/iOS目录中。我提供思路和核心代码,需要你结合自己使用的NGUI来修改。
NGUI中UI Sprite、UILabel、UIPanel等等都是继承抽象类UIRect。
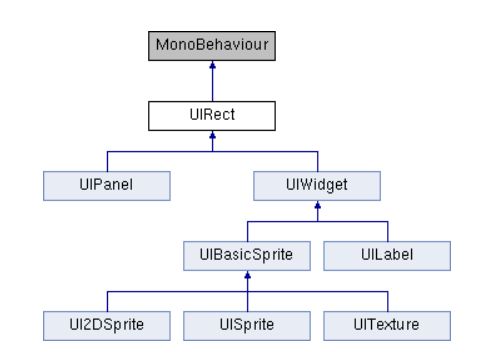
UIRect UI矩形包含4个锚点(每边一个),我们就是要控制锚点在安全区域显示。
在NGUITools.CS中增加代码:
#if UNITY_IOS && !UNITY_EDITOR
    [DllImport("__Internal")]
    private static extern void GetSafeArea(out float x, out float y, out float w, out float h);
#endif

    public static Rect SafeArea
    {
        get
        {
            return GetSafeArea();
        }
    }

    /// <summary>
    /// 获取iPhone X 等苹果未来的异型屏幕的安全区域SafeArea
    /// </summary>
    /// <returns>Rect</returns>
    public static Rect GetSafeArea()
    {
        float x, y, w, h;
#if UNITY_IOS && !UNITY_EDITOR
        GetSafeArea(out x, out y, out w, out h);
#else
        x = 0;
        y = 0;
        w = Screen.width;
        h = Screen.height;
#endif
        return new Rect(x, y, w, h);
    }

#if UNITY_EDITOR
    static int mSizeFrame = -1;
    static System.Reflection.MethodInfo s_GetSizeOfMainGameView;
    static Vector2 mGameSize = Vector2.one;

    /// <summary>
    /// Size of the game view cannot be retrieved from Screen.width and Screen.height when the game view is hidden.
    /// </summary>

    static public Vector2 screenSize
    {
        get
        {
            int frame = Time.frameCount;

            if (mSizeFrame != frame || !Application.isPlaying)
            {
                mSizeFrame = frame;

                if (s_GetSizeOfMainGameView == null)
                {
                    System.Type type = System.Type.GetType("UnityEditor.GameView,UnityEditor");
                    s_GetSizeOfMainGameView = type.GetMethod("GetSizeOfMainGameView",
                        System.Reflection.BindingFlags.NonPublic | System.Reflection.BindingFlags.Static);
                }
                mGameSize = (Vector2)s_GetSizeOfMainGameView.Invoke(null, null);
            }
            return mGameSize;
        }
    }
#else
    /// <summary>
    /// Size of the game view cannot be retrieved from Screen.width and Screen.height when the game view is hidden.
    /// </summary>

    static public Vector2 screenSize { get { return new Vector2(Screen.width, Screen.height); } }
#endif


    public static bool Simulate_X
    {
        get
        {
#if UNITY_EDITOR
            return (Screen.width == 812 && Screen.height == 375);
#else
            return false;
#endif
        }
    }

    /// <summary>
    /// 模拟iPhone X比例
    /// </summary>
    public static float Simulate_iPhoneXScale
    {
        get
        {
            if (!Simulate_X) return 1f;

            /*
            iPhone X 横持手机方向分辨率:2436 x 1125 px
            SafeArea:2172 x 1062 px
            左右边距分别:132px
            底边距(有Home条):63px
            顶边距:0px
            */
            float xwidth = 2436f;
            float xheight = 1125f;
            float margin = 132f;

            return (xwidth - margin * 2) / xwidth;
        }
    }
锚点的适配最终都会调用NGUITools.GetSides这个方法,这个方法实际上是NGUI为Camera写的扩展方法。
找到NGUITools.cs的static public Vector3[] GetSides(this Camera cam,float depth,Transform relativeTo)。我们追加一个bool showInSafeArea, 默认false。
static public Vector3[] GetSides(this Camera cam, float depth, Transform relativeTo, bool showInSafeArea = false)
    {
#if UNITY_4_3 || UNITY_4_5 || UNITY_4_6 || UNITY_4_7
        if (cam.isOrthoGraphic)
#else
        if (cam.orthographic)
#endif
        {
            float xOffset = 1f;
#if UNITY_IOS
            if (showInSafeArea)
            {
                xOffset = SafeArea.width / Screen.width;
            }
#elif UNITY_EDITOR
            if (showInSafeArea)
            {
                xOffset = Simulate_iPhoneXScale;
            }
#endif

            float os = cam.orthographicSize;
            float x0 = -os * xOffset;
            float x1 = os * xOffset;
            float y0 = -os;
            float y1 = os;

            Rect rect = cam.rect;
            Vector2 size = screenSize;

            float aspect = size.x / size.y;
            aspect *= rect.width / rect.height;
            x0 *= aspect;
            x1 *= aspect;

            // We want to ignore the scale, as scale doesn't affect the camera's view region in Unity
            Transform t = cam.transform;
            Quaternion rot = t.rotation;
            Vector3 pos = t.position;

            int w = Mathf.RoundToInt(size.x);
            int h = Mathf.RoundToInt(size.y);

            if ((w & 1) == 1) pos.x -= 1f / size.x;
            if ((h & 1) == 1) pos.y += 1f / size.y;

            mSides[0] = rot * (new Vector3(x0, 0f, depth)) + pos;
            mSides[1] = rot * (new Vector3(0f, y1, depth)) + pos;
            mSides[2] = rot * (new Vector3(x1, 0f, depth)) + pos;
            mSides[3] = rot * (new Vector3(0f, y0, depth)) + pos;
        }
        else
        {
            mSides[0] = cam.ViewportToWorldPoint(new Vector3(0f, 0.5f, depth));
            mSides[1] = cam.ViewportToWorldPoint(new Vector3(0.5f, 1f, depth));
            mSides[2] = cam.ViewportToWorldPoint(new Vector3(1f, 0.5f, depth));
            mSides[3] = cam.ViewportToWorldPoint(new Vector3(0.5f, 0f, depth));
        }

        if (relativeTo != null)
        {
            for (int i = 0; i < 4; ++i)
                mSides[i] = relativeTo.InverseTransformPoint(mSides[i]);
        }
        return mSides;
    }
还需要改动UIRect和UIRectEditor的相关方法:
1.在UIRect.cs中添加
[HideInInspector][SerializeField]public bool mShowInSafeArea = false;
2.修改GetSides的调用
/// <summary>
 /// Convenience function that returns the sides the anchored point is anchored to.
 /// </summary>
public Vector3[] GetSides (Transform relativeTo)
{
    if (target != null)
    {
        if (rect != null) return rect.GetSides(relativeTo);
        if (target.camera != null) return target.camera.GetSides(relativeTo, rect.mShowInSafeArea);//这里增加了是否在安全区域的参数
    }
    return null;
}
  /// <summary>
    /// Get the sides of the rectangle relative to the specified transform.
    /// The order is left, top, right, bottom.
    /// </summary>

    public virtual Vector3[] GetSides (Transform relativeTo)
    {
        if (anchorCamera != null)
        {
            return anchorCamera.GetSides(relativeTo, mShowInSafeArea);//这里增加了是否在安全区域的参数
        }
        else
        {
            Vector3 pos = cachedTransform.position;
            for (int i = 0; i < 4; ++i)
                mSides[i] = pos;

            if (relativeTo != null)
            {
                for (int i = 0; i < 4; ++i)
                    mSides[i] = relativeTo.InverseTransformPoint(mSides[i]);
            }
            return mSides;
        }
    }
3.UIRectEditor.CS扩展下
  /// <summary>
    /// Draw the "Anchors" property block.
    /// </summary>

    protected virtual void DrawFinalProperties ()
    {
        if (!((target as UIRect).canBeAnchored))
        {
            if (NGUIEditorTools.DrawHeader("iPhone X"))
            {
                NGUIEditorTools.BeginContents();
                {
                    GUILayout.BeginHorizontal();
                    NGUIEditorTools.SetLabelWidth(100f);
                    NGUIEditorTools.DrawProperty("ShowInSafeArea", serializedObject, "mShowInSafeArea", GUILayout.Width(120f));
                    GUILayout.Label("控制子节点的锚点在安全区域内显示");
                    GUILayout.EndHorizontal();

                }
                NGUIEditorTools.EndContents();
            }
        }


        //......原来的逻辑....
    }
4.GetSides的调用加上mShowInSafeArea。
补充:实际项目中,部分节点是UIAnchor来设置,所以这个脚本也要适配找到UIAnchor的UpDate。
 if (pc.clipping == UIDrawCall.Clipping.None)
{
    // Panel has no clipping -- just use the screen's dimensions
    float ratio = (mRoot != null) ? (float)mRoot.activeHeight / Screen.height * 0.5f : 0.5f;
    mRect.xMin = -Screen.width * ratio;
    mRect.yMin = -Screen.height * ratio;
    mRect.xMax = -mRect.xMin;
    mRect.yMax = -mRect.yMin;
}
5.这里都是直接使用Screen.width和Height,要改成安全区域Safe Area.width和Safe Area.height。
if (pc.clipping == UIDrawCall.Clipping.None)
{
    // Panel has no clipping -- just use the screen's dimensions
    float ratio = (mRoot != null) ? (float)mRoot.activeHeight / NGUITools.SafeArea.height * 0.5f : 0.5f;
    mRect.xMin = -NGUITools.SafeArea.width * ratio * NGUITools.Simulate_iPhoneXScale;
    mRect.yMin = -NGUITools.SafeArea.height * ratio;
    mRect.xMax = -mRect.xMin;
    mRect.yMax = -mRect.yMin;
}
这样NGUI也就可以了。

添加一个812x375就只可以直接预览:
以上,因为我的两个上线项目恰好分别适配了UGUI和NGUI,所以根据经验,总结了高效的Unity3D适配iPhone X技术方案,希望大家能有收获。
这是侑虎科技第404篇文章,感谢作者江继烽供稿。欢迎转发分享,未经作者授权请勿转载。如果您有任何独到的见解或者发现也欢迎联系我们,一起探讨。QQ群:793972859(原群已满员)
作者知乎:https://zhuanlan.zhihu.com/p/35538663,作者也是U Sparkle活动参与者,UWA欢迎更多开发朋友加入U Sparkle开发者计划,这个舞台有你更精彩!