
Unity预计算辐照度全局光照PRTGI实践与拓展(上)
- 作者:admin
- /
- 时间:5月27日
- /
- 浏览:948 次
- /
- 分类:厚积薄发
【USparkle专栏】如果你深怀绝技,爱“搞点研究”,乐于分享也博采众长,我们期待你的加入,让智慧的火花碰撞交织,让知识的传递生生不息!
在知乎平台上,最早由网易根据育碧在GDC上分享的《Global Illumination in Tom Clancy's The Division》提出了实时PRTGI(预计算辐射度全局光照)技术的实现思路。随后,AKG4e3提供了示例工程,其内容涵盖从理论到实践的PRTGI实现过程(参见《预计算辐照度全局光照(PRTGI)从理论到实战》)。方木君则在《Unity 移动端可用实时GI方案细节补充》中,对局部光源(Local Light)的重光照(Relight)及优化方案进行了扩展。
本文内容基于上述项目的Fork版本,在学习过程中进行了进一步完善与扩展。部分修改已记录于本人的Fork仓库(AkiKurisu/UnityPRTGI)中。但由于后续开发需要在Forward渲染路径下进行,相关修改已集成至其他项目,该Fork版本已停止维护。
后续还将结合其他在URP下实现的相关Feature进行整理与开源,敬请期待。
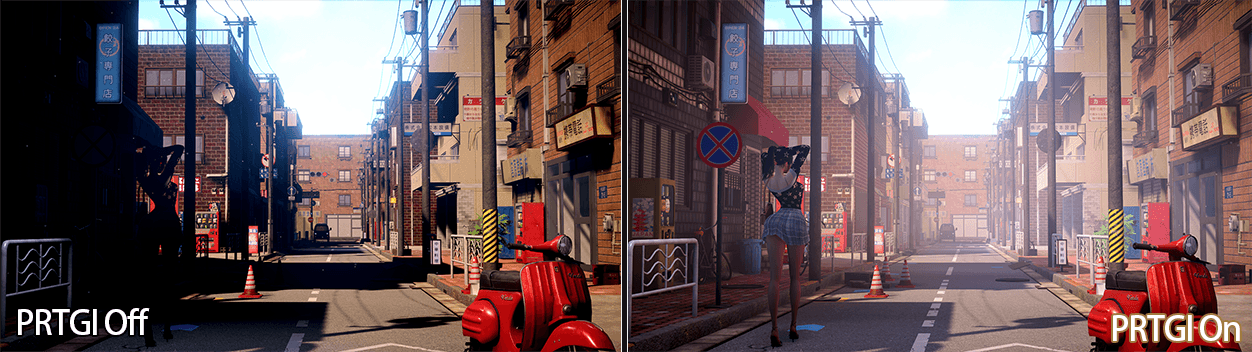
流程概述
先总结一下《预计算辐照度全局光照(PRTGI)从理论到实战》的项目中的流程,方便后续对比:
- 离线烘焙生成Surfel(总计512*Probe)
- 按Probe顺序存储Surfel
- 运行时Probe拿到对应的512个Surfel
- Relight所有Probe
烘焙提速
原作者使用Camera.RenderToCubemap来抓取Cubemap,这个函数在GPU上的开销实际不大,手动渲染每一个面的成本并没有减少,但可以考虑改成使用另一个拓展方法,来在构建RenderList的时候忽略非静态物体:
public static bool RenderToCubemap(
    this Camera camera,
    Texture target,
    int faceMask,
    StaticEditorFlags culledFlags);
通过不同场景的性能测试,烘焙这里更拖延速度的是CPU侧设置Material Shader的开销,由于需要分别设置Shader来采样Position、Albedo、Normal数据,实际开销约等于

次Shader设置,时间复杂度为

所以优化方式就是使用一个Shader,烘焙时只需要设置一次,每个Probe烘焙时通过切换Keyword来抓取所需数据。
#pragma multi_compile _ _GBUFFER_WORLDPOS _GBUFFER_NORMAL

float4 frag (v2f i) : SV_Target
{
    #if defined(_GBUFFER_WORLDPOS)
        // Output world position
        return float4(i.worldPos, 1.0);
    #elif defined(_GBUFFER_NORMAL)
        // Output world space normal
        return float4(i.normal, 1.0);
    #else
        // Default output albedo
        half4 albedo = SAMPLE_TEXTURE2D(_MainTex, sampler_MainTex, i.uv) * _Color;
        return albedo;
    #endif
}
private static void SetGlobalGBufferCaptureMode(GBufferCaptureMode captureMode)
{
    // Enable the specific keyword based on capture mode
    switch (captureMode)
    {
        case GBufferCaptureMode.WorldPosition:
            Shader.EnableKeyword("_GBUFFER_WORLDPOS");
            Shader.DisableKeyword("_GBUFFER_NORMAL");
            break;
        case GBufferCaptureMode.Normal:
            Shader.DisableKeyword("_GBUFFER_WORLDPOS");
            Shader.EnableKeyword("_GBUFFER_NORMAL");
            break;
        case GBufferCaptureMode.Albedo:
            Shader.DisableKeyword("_GBUFFER_WORLDPOS");
            Shader.DisableKeyword("_GBUFFER_NORMAL");
            break;
    }
}

// 对于每个Probe执行下面的代码
SetGlobalGBufferCaptureMode(GBufferCaptureMode.WorldPosition);
camera.RenderToCubemap(_worldPosRT, -1, StaticEditorFlags.ContributeGI);
SetGlobalGBufferCaptureMode(GBufferCaptureMode.Normal);
camera.RenderToCubemap(_normalRT, -1, StaticEditorFlags.ContributeGI);
SetGlobalGBufferCaptureMode(GBufferCaptureMode.Albedo);
camera.RenderToCubemap(_albedoRT, -1, StaticEditorFlags.ContributeGI);
如此一来时间复杂度为O(1),大大提升了复杂场景下的烘焙速度。
球谐优化
由于Unity 2023、Unity 6相关版本未在国内普及,其新增的APV(Adaptive Probe Volume)系统,国内相关技术讨论较少。然而,作为Unity官方新推出的GI方案,APV有大量值得学习的优化技巧。
PRT(Precomputed Radiance Transfer)和APV实际上师出同门,共通点是都不需要UV2、比LightMap方便,需要烘焙,仅支持静态场景,两者的核心差异在于:
- APV:每个Probe离线存储球谐系数,不支持动态光照(如TOD系统),但因为存储了SkyVisibility,可以实现动态的天光遮蔽。
- PRT:存储Radiance数据和SkyVisibility,支持动态光照。
PRT缺点也很明显,因为要存储的数据更多了,使得实践上Probe放置的密度小于APV的密度,这使得高频的Diffuse信息会被忽略,所以更适合(半)室外。
尽管应用场景不同,APV作为Unity官方实现,其优化策略具有重要的参考价值。
原项目SH.hlsl中的球谐函数实现使用大量条件判断:
// 老版本 - 大量分支判断
float SH(in int l, in int m, in float3 s)
{
    if (l == 0) return kSHBasis0;
    if (l == 1 && m == -1) return kSHBasis1 * y;
    if (l == 1 && m == 0) return kSHBasis1 * z;
    // ... 更多条件判断
    return0.0;
}

// 在循环中重复调用
for (int shIndex = 0; shIndex < 9; shIndex++)
{
    contribution = SHProject(shIndex, dir) * totalRadiance * 4.0 * PI / SampleCount;
    // 每次调用都要执行完整的条件判断逻辑
}
这种GPU上的条件分支会导致Warp Divergence,且影响性能。
下面是参考Unity的SphericalHarmonics.hlsl的实现方式,使用向量化方式来优化。
对照用的公式,数学不好不会推也没事:
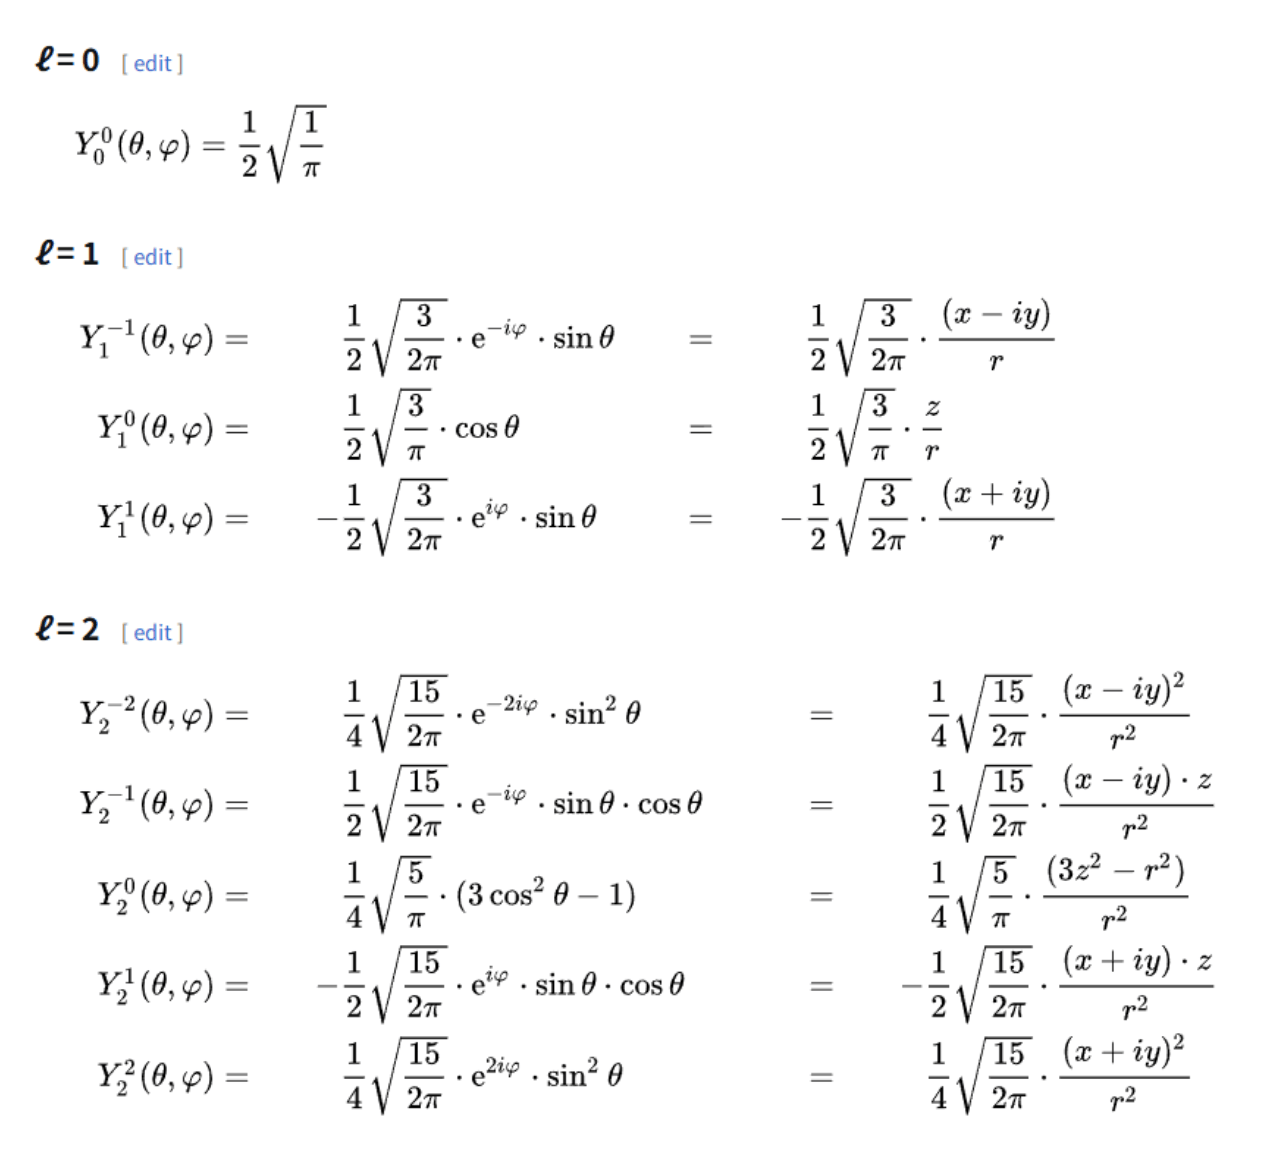
向量化版本:
// 新版本 - 向量化计算
void EvaluateSH9(in float3 dir, out float sh[9])
{
    float x = dir.x;
    float y = dir.y;
    float z = dir.z;

    // L0 (constant)
    sh[0] = 1.0; // Constant term (will be multiplied by kSHBasisCoef[0])

    // L1 (linear)
    sh[1] = y;    // Y_1_-1
    sh[2] = z;    // Y_1_0
    sh[3] = x;    // Y_1_1

    // L2 (quadratic)
    sh[4] = x * y;                          // Y_2_-2
    sh[5] = y * z;                          // Y_2_-1
    sh[6] = 3.0 * z * z - 1.0;              // Y_2_0  (Equals 2.0 * z * z - x * x - y * y)
    sh[7] = x * z;                          // Y_2_1
    sh[8] = x * x - y * y;                  // Y_2_2

    // Apply kSHBasisCoef to get the final SH basis values
    [unroll]
    for (int i = 0; i < 9; ++i)
    {
        sh[i] = sh[i] * kSHBasisCoef[i];
    }
}

// 优化后的使用方式
float shCoeffs[9];
EvaluateSH9(dir, shCoeffs); // 一次计算所有系数

[unroll]
for (int shIndex = 0; shIndex < 9; shIndex++)
{
    contribution = shCoeffs[shIndex] * totalRadiance * 4.0 * PI / SampleCount;
    // 直接数组访问,无分支判断
}
这种方式可以连续访问,性能更好。
除了向量化外,APV系统中一个巧妙的优化是在球谐系数上预除PI,减少Radiance转为Irradiance时的ALU开销:
// Clamped cosine convolution coefs (pre-divided by PI)
// See https://seblagarde.wordpress.com/2012/01/08/pi-or-not-to-pi-in-game-lighting-equation/
#define kClampedCosine0 1.0f
#define kClampedCosine1 2.0f / 3.0f
#define kClampedCosine2 1.0f / 4.0f

static const float kClampedCosineCoefs[] = {
    kClampedCosine0, kClampedCosine1, kClampedCosine1, kClampedCosine1,
    kClampedCosine2, kClampedCosine2, kClampedCosine2, kClampedCosine2, kClampedCosine2
};
这个优化基于Sébastien Lagarde的经典文章《Pi or not to Pi in game lighting equation》。什么时候改乘PI也是实时渲染中一个比较经典的问题,例如URP中的Lambert BRDF就没有除PI,目的是简化灯光流程,让灯光颜色调整时所见即所得。
3D纹理
原作者存储球谐是将27位float存在一个巨大的ComputeBuffer中,这导致需要使用定点数Encode并且使用较多的原子操作。
这个方式弊病很多,一方面没有利用GPU的优势(对3D纹理的硬件优化),另一方面原子操作导致写入前需要Clear,需要使用双缓冲来维护,内存翻倍。
// 使用定点数存储小数, 因为 compute shader 的 InterlockedAdd 不支持 float
// array size: 3x9=27
RWStructuredBuffer<int> _coefficientSH9;

// storage to volume
if(_indexInProbeVolume >= 0)
{
    constint coefficientByteSize = 27;
    int offset = _indexInProbeVolume * coefficientByteSize;
    for(int i = 0; i < 9; i++)
    {
        InterlockedAdd(_coefficientVoxel[offset + i * 3 + 0], EncodeFloatToInt(c[i].x));
        InterlockedAdd(_coefficientVoxel[offset + i * 3 + 1], EncodeFloatToInt(c[i].y));
        InterlockedAdd(_coefficientVoxel[offset + i * 3 + 2], EncodeFloatToInt(c[i].z));
    }
}
我将其修改为probeSizeX,probeSizeZ,probeSizeY*9大小,格式为RGB111110Float的3D纹理。虽然这样还是会有一定的CacheMiss,但相比使用ComputeBuffer来存储球谐系数性能更好,并且可以方便在FrameDebugger中查看。
// Layout: [probeSizeX, probeSizeZ, probeSizeY * 9]
RWTexture3D<float3> _coefficientVoxel3D;

if (_indexInProbeVolume >= 0)
{
    // Write to 3D texture
    int3 texCoord = ProbeIndexToTexture3DCoord(_indexInProbeVolume, index, _coefficientVoxelSize);
    _coefficientVoxel3D[texCoord] = groupCoefficients[0];
}
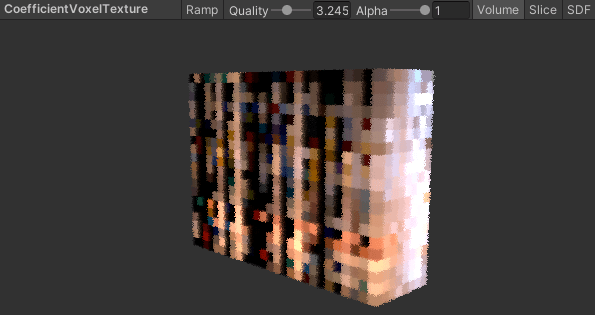
需要注意Relight时为了计算MultiBounce我们依然需要访问上一帧的球谐系数,这使得在一个线程中可能存在同时访问和写入的可能,所以只是将ComputeBuffer修改为3D纹理后,还不能去除双缓冲,还需要之后的几步优化。
并行规约
由于改成3D纹理,我们需要解决原来作者没处理的球谐系数求和问题,这本质是GPU中的多线程求和问题即并行规约问题。
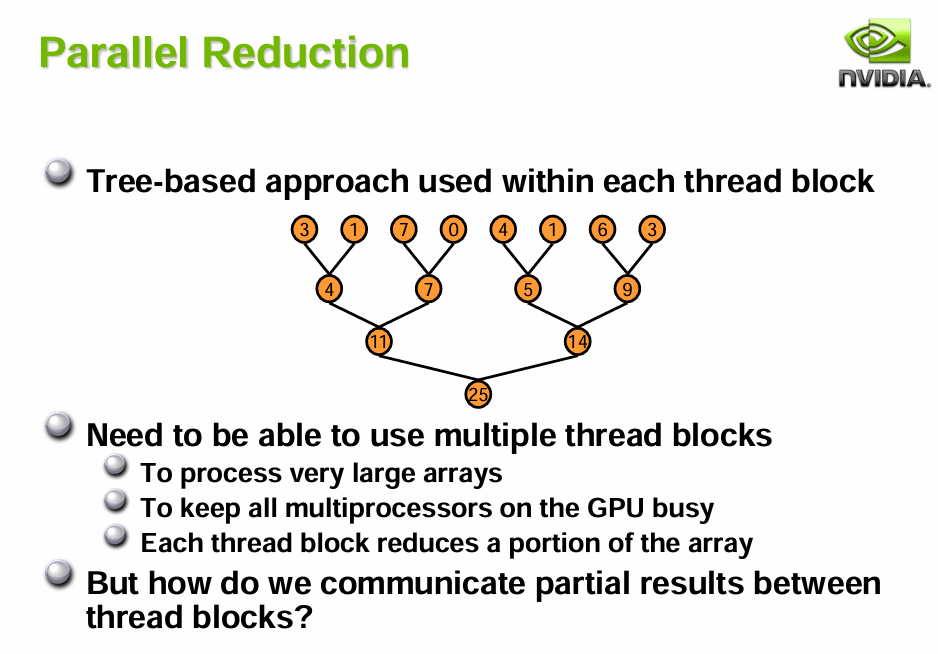
无需掌握底层原理,英伟达直接提供了最佳实践:
《Optimizing Parallel Reduction in CUDA》
在CS中实现起来非常简单,我们有512个Thread,刚好是2次幂,因此可以直接使用PPT中的方法3。
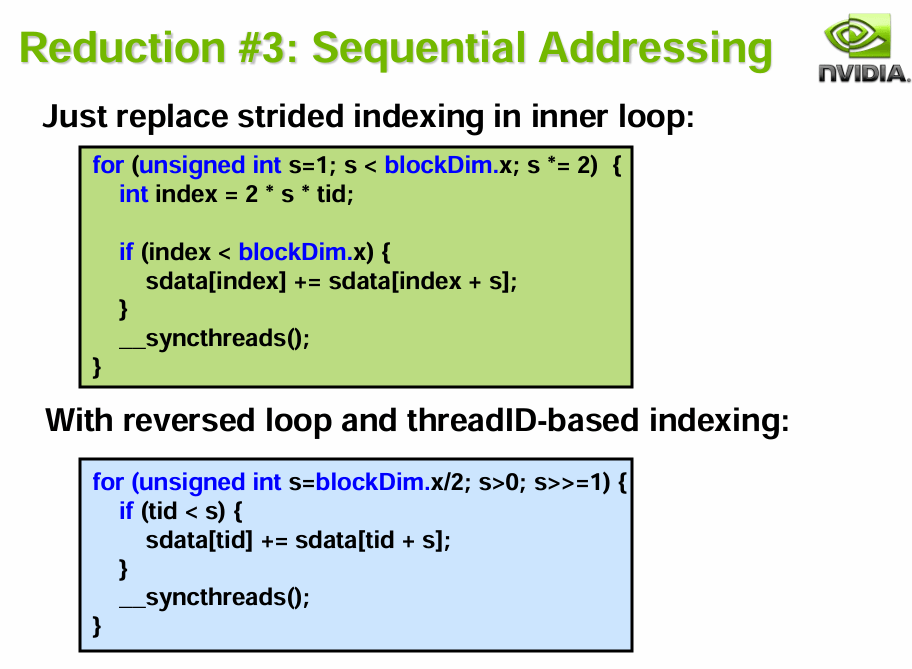
// Parallel reduction
for (uint stride = 256; stride > 0; stride >>= 1)
{
    if (groupIndex < stride)
    {
        groupCoefficients[groupIndex] += groupCoefficients[groupIndex + stride];
    }

    GroupMemoryBarrierWithGroupSync();
}
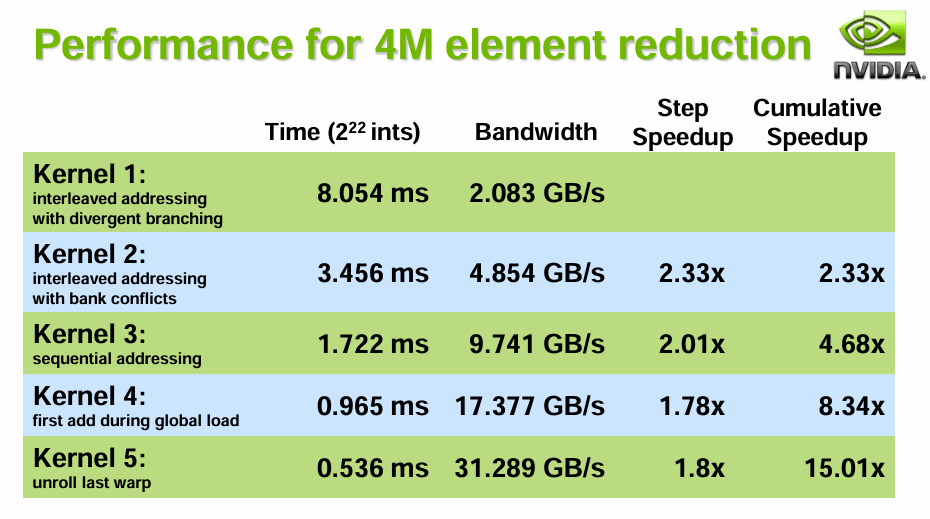
由于利用了多线程能力,带宽换时间,性能大概提升2倍,还有两个进阶版本可以更有效利用带宽,但代码实在有些繁琐,用第三种基本足够了。
但需要注意这里如果直接存所有二阶球谐系数(27个float)到LDS后再并行规约,可能会导致超出阈值或使用了过多寄存器造成性能下降,为了消除该问题,我将二阶球谐的9个维度放在循环里分别进行规约。
UNITY_UNROLL
for (int shIndex = 0; shIndex < 9; shIndex++)
{
    float3 contribution = ...;

    groupCoefficients[groupIndex] = contribution;
    GroupMemoryBarrierWithGroupSync();

    // Parallel reduction for non-power-of-2 size
    for (uint stride = ThreadCount / 2; stride > 0; stride >>= 1)
    {
        if (groupIndex < stride)
        {
            groupCoefficients[groupIndex] += groupCoefficients[groupIndex + stride];
        }
        GroupMemoryBarrierWithGroupSync();
    }

    // Write results
    if (groupIndex == 0 && _indexInProbeVolume >= 0)
    {
        uint3 texCoord = ProbeIndexToTexture3DCoord(_indexInProbeVolume, shIndex, _coefficientVoxelSize);
        _coefficientVoxel3D[texCoord] = groupCoefficients[0];
    }

    GroupMemoryBarrierWithGroupSync();
}
但这样明显会增多同步次数,后续我们会再次来优化这部分。
分帧Relight
由于现有方法是需要每帧遍历所有Probe进行Relight,这导致场景越大或Probe密度越大,Relight成本越高,时间复杂度为$O(N_\text{probes})$。为了性能可控,我们可以利用Diffuse GI低频的特点,将Relight的步骤分摊到多帧。
void DoRelight(CommandBuffer cmd, PRTProbeVolume volume)
{
    volume.SwapCoefficientVoxels();

    // 如果是多帧Relight,则不需要清空体素
    if (!multiFrameRelight)
        volume.ClearCoefficientVoxel(cmd);

    // May only update a subset of probes each frame
    using (ListPool<PRTProbe>.Get(outvar probesToUpdate))
    {
        volume.GetProbesToUpdate(probesToUpdate);
        foreach (var probe in probesToUpdate)
        {
            probe.ReLight(cmd, _relightCS, _relightKernel);
        }
    }

    // Advance volume render frame
    volume.AdvanceRenderFrame();
}

// 滚动获取当前帧要更新的Probe
public void GetProbesToUpdate(List<PRTProbe> probes)
{
    for (int i = _currentProbeUpdateIndex; i < _currentProbeUpdateIndex + probesToUpdateCount; i++)
    {
        probes.Add(Probes[i]);
    }
}

public void AdvanceRenderFrame()
{
    // Advance the update index for next frame
    _currentProbeUpdateIndex = (_currentProbeUpdateIndex + probesToUpdateCount) % Probes.Length;
}

回到文章《Global Illumination in Tom Clancy's The Division》的方案,这并不是使用简单的轮询法(Round Robin),而是将一组组Probe划分为一个个Sector,每帧Relight两组,并且对于相机周围的Probe再额外Relight一组。
这里是否要划分Sector笔者觉得不太重要,但Relight玩家相机附近的Probe确实是有必要的,我们可以修改为每帧计算相机附近的Probe,添加到上面的GetProbesToUpdate中。
/// <summary>
/// Update local probe indices based on camera position
/// </summary>
private void UpdateLocalProbeIndices()
{
    if (!_mainCamera || Probes == null || Probes.Length == 0)
        return;

    Vector3 cameraPos = _mainCamera.transform.position;

    // Only recalculate if camera has moved significantly
    if (Vector3.Distance(cameraPos, _lastCameraPosition) < CameraMovementThreshold)
        return;

    _lastCameraPosition = cameraPos;
    _localProbeIndices.Clear();

    // Convert camera position to probe grid coordinates for more efficient distance calculation
    Vector3 gridPos = (cameraPos - transform.position) / probeGridSize;

    // Calculate distances from camera to all probes using grid coordinates
    using (ListPool<(int index, float distance)>.Get(outvar probeDistances))
    {
        for (int i = 0; i < Probes.Length; i++)
        {
            if (Probes[i])
            {
                // Calculate probe position in grid coordinates
                Vector3 probeGridPos = (Probes[i].transform.position - transform.position) / probeGridSize;

                // Use squared distance for efficiency (avoiding sqrt)
                float sqrDistance = (gridPos - probeGridPos).sqrMagnitude;
                probeDistances.Add((i, sqrDistance));
            }
        }

        // Sort by distance and take the closest ones
        probeDistances.Sort(static (a, b) => a.distance.CompareTo(b.distance));

        int count = Mathf.Min(localProbeCount, probeDistances.Count);
        for (int i = 0; i < count; i++)
        {
            _localProbeIndices.Add(probeDistances[i].index);
        }
    }
}
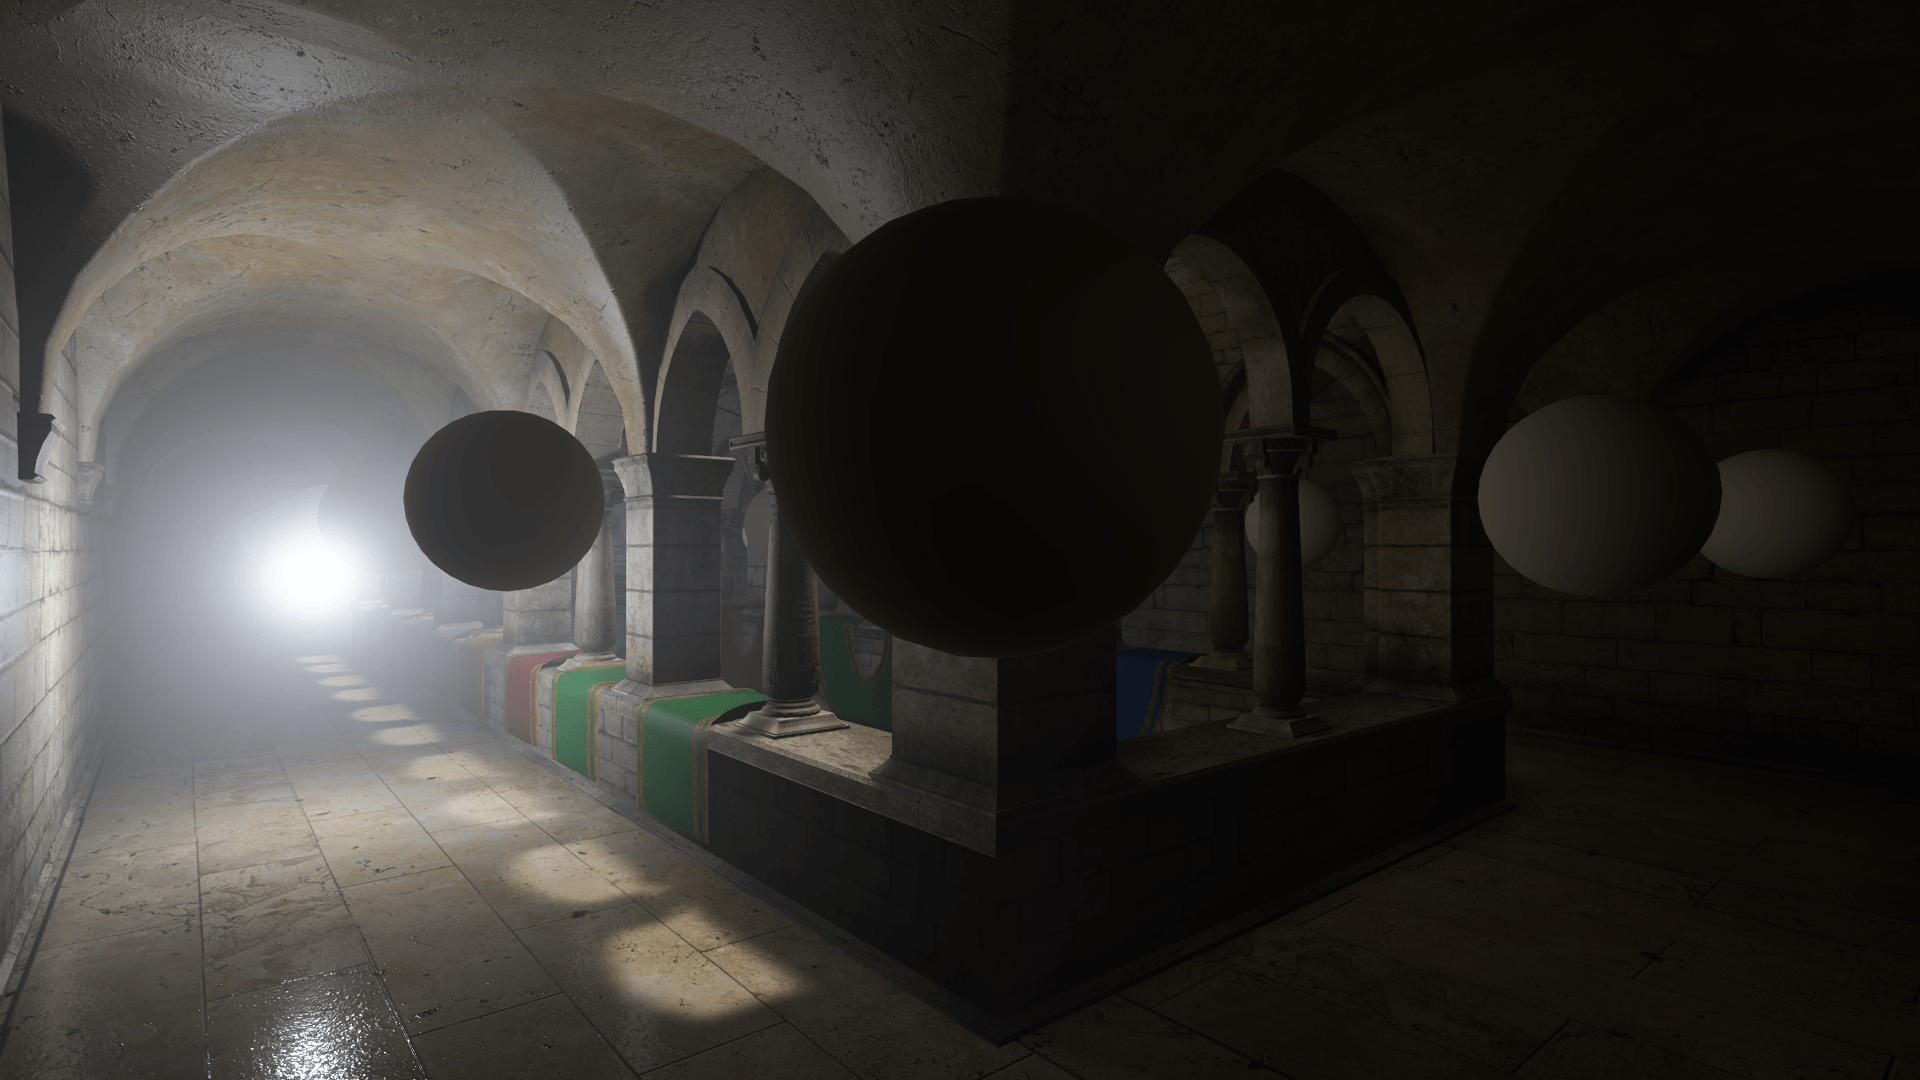
Forward+多光源适配
理论上只要添加_FOWARD_PLUS宏后就可以使用了,但从URP 14后会遇到一个离谱的编译问题。
Can't find included file `Packages/com.unity.render-pipelines.ps5/ShaderLibrary/API/FoveatedRendering_PSSL.hlsl`
CS的编译似乎无视了SHADER_API_PS5宏,导致找不到平台文件报错,问题是散修开发者也没PS5平台的引擎拓展。
国内有开发者咨询了Unity官方,得到的AI答复是:URP14.0.7及之后的版本下计算着色器库文件引用问题。
因此在不修改源码的情况下,最佳的解决方案就是本地创建一个空的com.unity.render-pipelines.ps5库,里面写一个空的FoveatedRendering_PSSL.hlsl。
然后我们在LightLoop前加上下面的代码,初始化Cluster需要拿到Surfel的屏幕坐标和世界坐标:
#if _FORWARD_PLUS
    float2 uv = ComputeNormalizedDeviceCoordinates(surfel.position, UNITY_MATRIX_VP);
    InputData inputData = (InputData)0;
    inputData.normalizedScreenSpaceUV = uv;
    inputData.positionWS = surfel.position;
#endif
    uint pixelLightCount = GetAdditionalLightsCount();
    LIGHT_LOOP_BEGIN(pixelLightCount) // 这里会创建Cluster
    // Light Loop...
    LIGHT_LOOP_END
体积雾适配
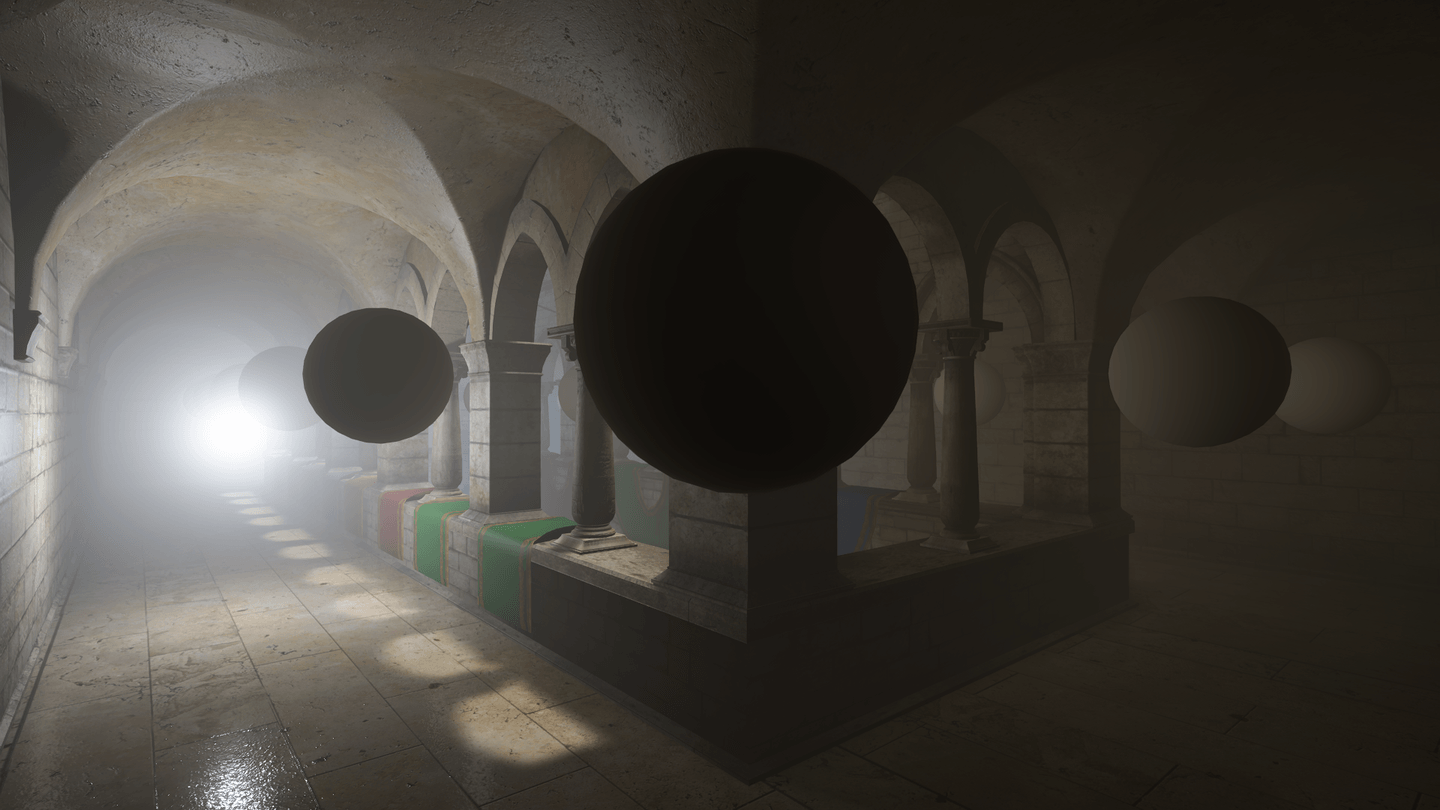
《Global Illumination in Tom Clancy's The Division》文章分享中也谈到了体积雾可以在Raymarch时同时采样PRT Volume,笔者这里使用了一个开源的体积光方案:
CristianQiu/Unity-URP-Volumetric-Light
把其中采样APV的贡献改成采样PRT Volume后,就实现了类似的效果:
阴影缓存
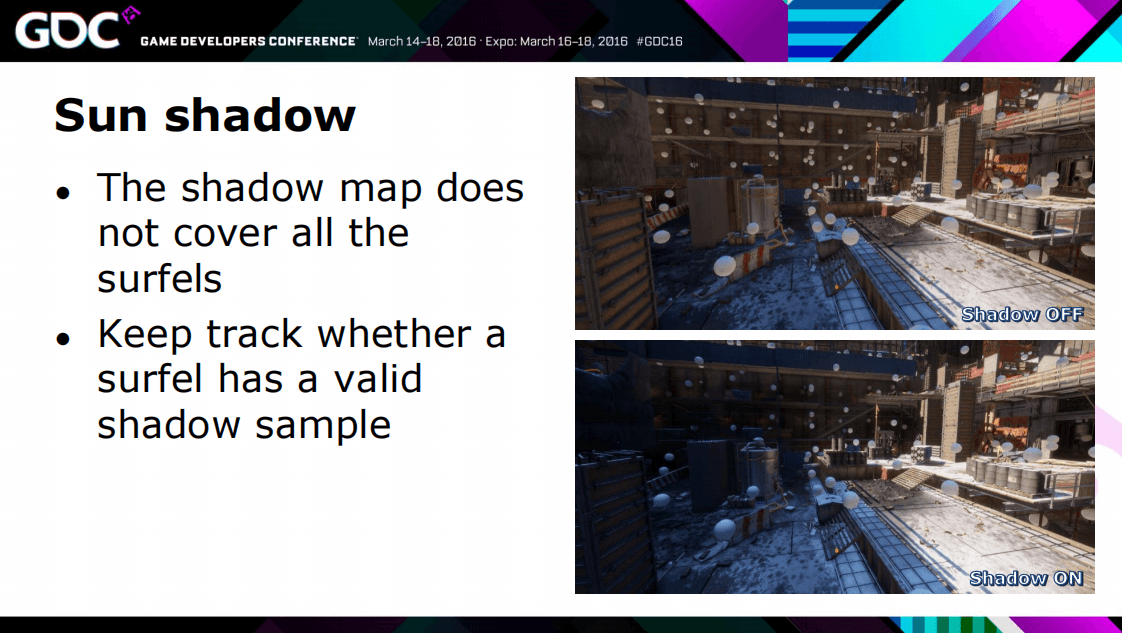
《Global Illumination in Tom Clancy's The Division》和《实时PRTGI技术与实现》文章中都提到不在视锥内的物体会被CSM剔除,因此对于离屏物体,我们需要添加一个Shadow Cache来保留最近一次有效的主光源阴影信息。
// mainlight shadow
float4 shadowCoord = TransformWorldToShadowCoord(surfel.position);
if (!BEYOND_SHADOW_FAR(shadowCoord))
{
    // Shadow is valid, sample and update cache
    atten = SampleShadowmap(
        TEXTURE2D_ARGS(_MainLightShadowmapTexture, sampler_MainLightShadowmapTexture),
        shadowCoord,
        GetMainLightShadowSamplingData(),
        GetMainLightShadowParams(),
        false
    );

    // Update shadow cache with new valid result
    _shadowCache[surfelGlobalIndex] = atten;
}
else
{
    // Shadow is invalid, use cached result if available
    atten = _shadowCache[surfelGlobalIndex];
}
Surfel合并Brick
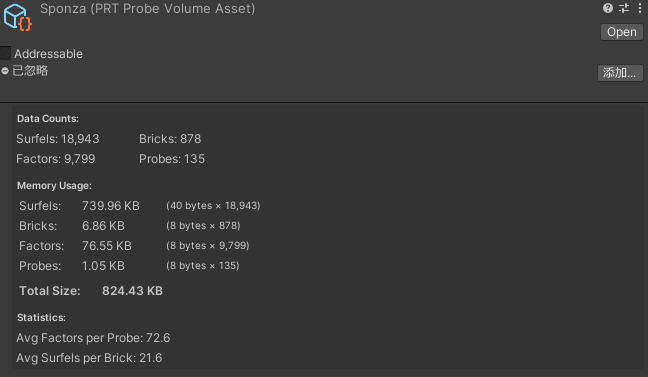
我们回过头看下现在的数据存储,对于每个Probe我们都存放了其512个Surfel数据,如果两个Probe挨着很近,那很大概率Surfel的数据是比较重复的,对于离得很近、方向基本一致的Surfel,我们实际可以清理一部分冗余数据。
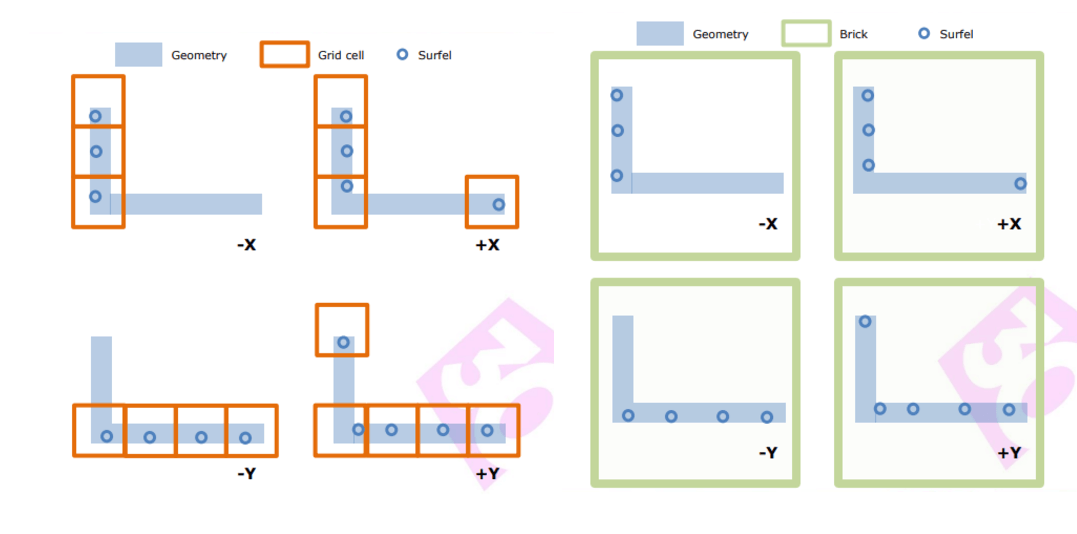
《Global Illumination in Tom Clancy's The Division》文章中的全境封锁给予了一个方案,即根据Grid大小(4×4×4)和Surfel的法线的主方向来聚集为Brick。同一个Brick中的Surfel数据就可以提取一下特征(比如对于坐标相同、法线方向相近的Surfel进行合并)。
下面是数据结构:
/// <summary>
/// Represents the indices of a Surfel
/// </summary>
[Serializable]
publicstruct SurfelIndices
{
    publicint start;

    publicint end;
}

/// <summary>
/// Represents a 4x4x4 brick containing merged Surfels
/// </summary>
publicclassSurfelBrick
{
    publicreadonly List<int> SurfelIndices = new();

    publicreadonly HashSet<PRTProbe> ReferencedProbes = new();
}
SurfelBrick即为烘焙时的Brick存储结构,由于Surfel不再唯一对应一个Probe,我们还需要在烘焙期间存储Probe的引用关系,直到存储数据时再扁平化为索引。
从实现细节上来讲,对于每个Probe完成Sample后,需要将Surfel注册到一个具有HashGrid结构的BrickManager中(根据Surfel世界坐标和主方向计算Hash),BrickPool找到对应位置的SurfelBrick将其添加或合并,并记录引用的Probe。
其次因为Surfel被合并为Brick,Probe不再直接引用其烘焙阶段命中的512个Surfel,在序列化前我们需要额外的数据来存储Relight时Probe所需的数据。 参考文章《Global Illumination in Tom Clancy's The Division》,下面是一个示例:
/// <summary>
/// Factor structure: contains Brick index and the contribution weight of that Brick to the Probe
/// </summary>
[Serializable]
publicstruct BrickFactor
{
    publicint brickIndex;

    publicfloat weight;
}

/// <summary>
/// Factor range: each Probe stores the range of Factors it uses
/// </summary>
[Serializable]
publicstruct FactorIndices
{
    publicint start;

    publicint count;
}
这里BrickFactor对应了一个Brick对于一个Probe的贡献权重,可以离线通过Brick中所有Surfel的平均法线计算,空间换时间。FactorIndices即是一个Probe所对应的Factor范围。
最后我们根据Probe顺序将FactorIndices、BrickFactor、SurfelIndices和Surfel进行排序,尽可能保证数据访问时的连续性。
结合上面的数据结构,下面是从烘焙到使用的新流程:
- Probe发射512个射线采样生成Surfel
- Surfel合并聚集到Brick
- Brick平均法线计算Probe贡献系数,存到Factor中
- 存储Factor、Brick、以及合并后的全部Surfel
- 运行时Volume拿到全部Surfel、Brick、Factor数据,提交GPU
- Relight所有Brick
- Relight所有Factor
为了验证数据正确,这里优先编写一下Brick的Gizmos视图,方便在编辑器看到各个Brick对选中Probe的贡献值以及Brick中各个Surfel方向是否朝向一致。
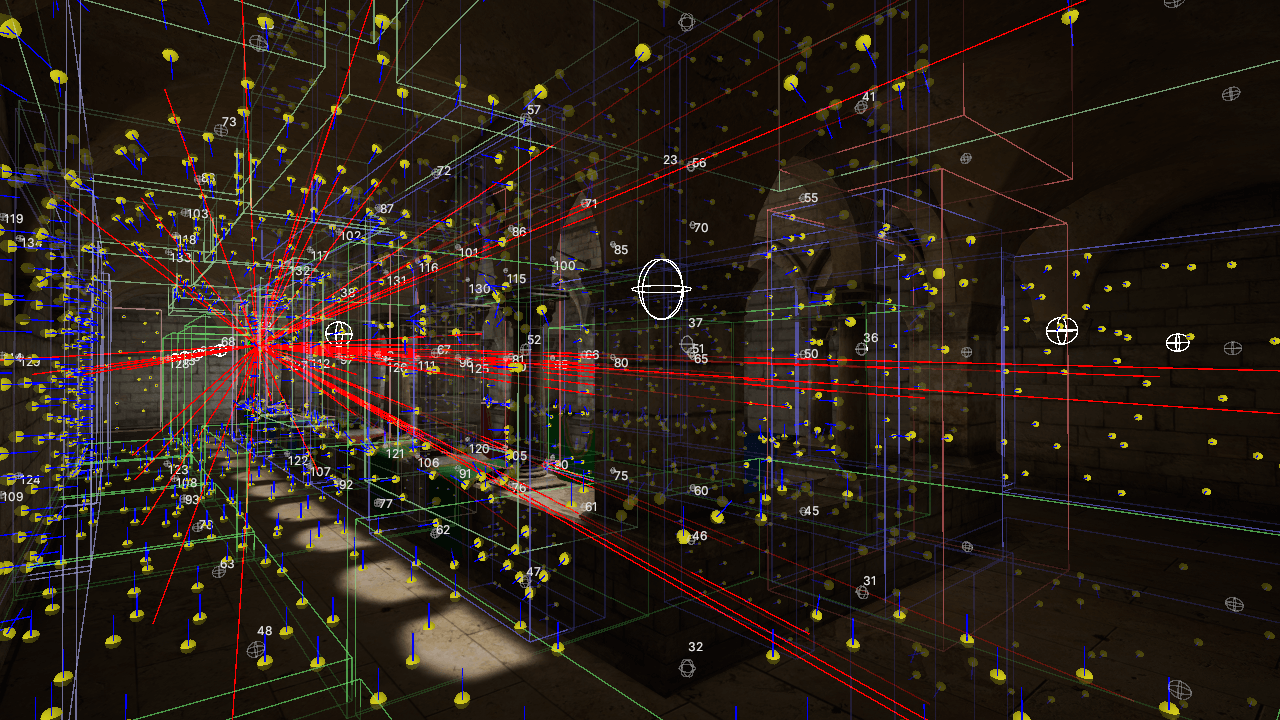
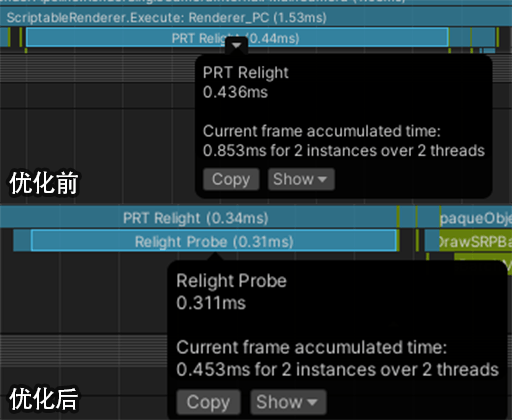
我们对比下性能,因为Surfel数据大量进行了合并,Relight Brick开销非常小,而Probe在Relight时采样的Brick数量也远远小于原先的512个,因此开销也有所下降。但需要注意这个合并实际会让GI精度下降,所以对于室内部分,我认为肯定是需要结合SSGI使用的。
注意这里开启了Multi Frame Relight来控制每帧更新的Probe数量(这里为1帧15个Probe)。
在我们完成Surfel和Probe的Relight分离后,还可以额外获得两个免费的优化效果:
- 由于不再存在3D纹理的写入和读取冲突,Relight不再需要历史帧缓冲,可以减少一张3D纹理使用。
- 由于ProbeRelight所需的Brick变少了(从512减到小于256),足够我们将二阶球谐27个float直接写入LDS中。现在的并行规约代码如下:
#define ThreadCount 256 // Max Brick Num
groupshared float3 groupCoefficients[9][ThreadCount];

// Compute all SH coefficients at once using vectorized approach
float shCoeffs[9];
EvaluateSH9(dir, shCoeffs);

float weight = 4.0 * PI / sampleCount;

// Process each SH coefficient and store to LDS
UNITY_UNROLL
for (int shIndex = 0; shIndex < 9; shIndex++)
{
    float3 contribution = shCoeffs[shIndex] * totalRadiance * weight;

    groupCoefficients[shIndex][groupIndex] = contribution;
}
GroupMemoryBarrierWithGroupSync();

// Parallel reduction for non-power-of-2 size
for (uint stride = ThreadCount / 2; stride > 0; stride >>= 1)
{
    if (groupIndex < stride)
    {
        UNITY_UNROLL
        for (int shIndex = 0; shIndex < 9; shIndex++)
        {
            groupCoefficients[shIndex][groupIndex] += groupCoefficients[shIndex][groupIndex + stride];
        }
    }
    GroupMemoryBarrierWithGroupSync();
}
那么上半部分就是这些了,下半部分我们继续优化和拓展PRTGI。
参考文章
[1] 实时PRTGI技术与实现
[4] Global Illumination in Tom Clancy's The Division
[5] Pi or not to Pi in game lighting equation
这是侑虎科技第1983篇文章,感谢作者AkiKurisu供稿。欢迎转发分享,未经作者授权请勿转载。如果您有任何独到的见解或者发现也欢迎联系我们,一起探讨。(QQ群:793972859)
作者主页:https://www.zhihu.com/people/akikurisu
再次感谢AkiKurisu的分享,如果您有任何独到的见解或者发现也欢迎联系我们,一起探讨。(QQ群:793972859)